
< Previous | Contents | Next >
Section 2-4 YP47 Steel Plates
231. Application
1. The requirements in this Section process of YP47 Steel Plates for
apply to tests and inspection for the approval of manufacturing longitudinal structural members in the upper deck region of con-
tainer carriers as specified in Pt 2, Ch 1, Sec 3 of the Rules.
2. Requirements other than those specified in this Section are to be in accordance with the require- ments of Section 2-1.
232. Data to be submitted
The following reference data in addition to those specified in 102. are to be submitted to the Society.
(1) Data to be submitted are to be as given in 202.
(2) In addition to (1) above, aim maximum Pcm content
233. Approval tests
1. General
Approval test items, test methods and acceptance criteria not specified in this Requirements are to be in accordance with Section 2-1.
2. Approval range
One test product with the maximum thickness to be approved is to be selected provided the ap- proved target chemical composition range remains unchanged.
3. Base Metal test
(1) Charpy V-notch Impact Tests
(A) Test samples are to be taken from the plate corresponding to the top of the ingot, unless
otherwise agreed. In the case of continuous randomly selected plate.
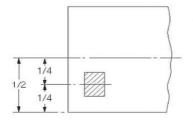
(B) The location of the test sample is to be at
castings, test samples are to be taken from a
the square cut end of the plate, approximately
one-quarter width from an edge, as shown Fig. 2.2.1.

Fig 2.2.1 Plates and flats
(C) Samples are to be taken with respect to the principal rolling direction of the tions representing the top and bottom of the plate as follows:
- Longitudinal Charpy V-notch impact tests : Top and bottom,
- Transverse Charpy V-notch impact tests : Top only,
- Strain aged longitudinal Charpy V-notch impact test : Top only,
plate at loca-
(D) Charpy V-notch impact tests are required from both the quarter and mid thickness locations
of the test samples. One set of 3 Charpy V-notch impact specimens is required for each impact test.
(E) The Charpy V-notch impact test temperature is to be -40°C.
(F) In addition to the determination of the energy value, the lateral expansion and the percent- age crystallinity are also to be reported.
(G) The strain aged samples are to be strained to 5% followed by heating to 250°C for 1 hour
Guidance for Approval of Manufacturing Process and Type Approval, Etc. 2015 19
Ch 2 Approval of Manufacturing Process Ch 2, Sec 2-4
![]()
prior to testing.
(H) Additionally at each location, Charpy V-notch impact tests are to be carried out with appro- priate temperature intervals to properly define the full transition range.
(2) Brittle fracture initiation test
(A) Deep notch test or Crack Tip Opening Displacement (CTOD) test is to be carried out and the result is to be reported.
(B) CTOD test is to be carried out in accordance with BS 7448 or equivalent.
(C) When performing the deep notch test, manufacturer is to submit the detailed test procedure to the Society.
(D) Manufacturer is to be consulted with the Society the dimension of test specimen, test con- dition, etc.
(3) Naval Research Laboratory (NRL) drop weight test
(A) The test method is to comply with ASTM E208 or equivalent method.
(B) Nil Ductility Test Temperature (NDTT) is to be reported for reference and photographs of the tested specimens are to be taken and enclosed with the test report.
(4) Brittle crack arrest test
(A) Standard ESSO test described in Annex 2 of
Thick Steel Plates) or other alternative test (e.g.
UR S33 (Safety Measures of Extremely
double tension test etc.) is to be carried
out in order to obtain the brittle crack arrest toughness for reference.
(B) In case of other alternative test, manufacturer is to submit the detailed test procedure to the Society and to be consulted with the Society the dimension of test specimen, test condition, etc.
4. Weldability test
(1) Charpy V-notch Impact Test
(A) Charpy V-notch impact tests are to be taken at a position of 1/4 thickness from the plate surface on the face side of the weld with the notch perpendicular to the plate surface.
(B) One set of the specimens transverse to the weld is to be taken with the notch located at the fusion line and at a distance 2, 5 and minimum 20 mm from the fusion line.
(C) The fusion boundary is to be identified by etching the specimens with a suitable reagent.
(D) One additional set of the specimens is to be taken from the root side of the weld with the notch located at the same position and at the same depth as for the face side.
(E) The impact test temperature is -40°C.
(F) Additionally at each location, impact tests are to be carried out with appropriate temperature intervals to properly define the full transition range.
(2) Y-shape weld crack test (Hydrogen crack test)
(A) The test method is to be in accordance with recognized national standards such 0870, JIS Z 3158 or GB 4675.1.
(B) Acceptance criteria are to be as deemed appropriate by the Society.
(3) Brittle fracture initiation test
(A) Deep notch test or CTOD test is to be carried out.
(B) Test method and results are to be in accordance with 3. (2) of this requirements.
as KS B
20 Guidance for Approval of Manufacturing Process and Type Approval, Etc. 2015
Ch 2 Approval of Manufacturing Process Ch 2, Sec 3
![]()