
< Previous | Contents | Next >
Section 5 Welders and Welder Performance Qualification Tests
501. General
1. Qualification of tack welder
Qualification tests for tack welder, specified in 501. 2 of the Rules, are to be carried out in ac- cordance with the followings:
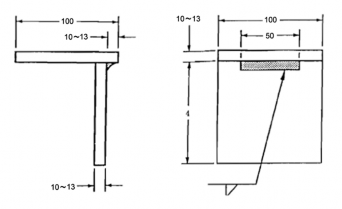
(1) Test assembly is to comply with Fig 2.2.7 of the Guidance. The leg length of tack welds will not be more than 6 mm. The bead length of tack welds may be of about 50 mm

Fig 2.2.7 Type and dimension of test assembly for qualification of tack welder
(2) Visual inspection is to comply with Pt 2, Ch 2, 503. 3 (2) of the Rules and fracture test is to comply with Pt 2, Ch 2, 503. 3 (5) of the Rules.
(3) The qualified thickness range is more than 3 mm.
(4) The positions for qualification test and positions qualified for actual welding work are to com- ply with the requirements for the fillet joint of plates in Pt 2, Ch 2, 502. 6, Table 2.2.14 of
the Rules.
2. Qualification of welding operator
Qualification of welding operator specified in 501. 3 of the Rules are to be carried out as follows:
(1) Test assembly is to comply with Pt 2, Ch 2, 404. 3 of the Rules. The width of test assembly is not to be less than 300 mm and the length not to be less than 400 mm.
(2) Tests and inspections are to comply with Pt 2, Ch 2, 503. 3 of the Rules.
3. Qualification of Gas welders
In application to 501. 4 of the Rules, the Qualification of gas welder is to comply with the fol- lowings:
(1) Gas welders are to have the qualification in Table 2.2.12, 2.2.13 and 2.2.14 of the Rules ac- cording to the kind of welding material, plate thickness and welding position.
(2) Test assemblies used in the qualification test are to be of without backing, and gas welding
rods are to be those for mild steel complying with a K S D 7005 (Gas welding rods for mild steel) or those considered appropriate by the Society.
(3) To the kind and procedure of the qualification tests, the requirements specified in Sec 5 of the
Rules are to be applied. For roller bend test, the radii of the plunger of the jig and support roller are to be 10 mm, and the roller spans to be 53 mm.
(4) The qualifications for gas welders is to represent "symbol G ".
4. Qualification test for 9 % Ni steel
In application to 501. 4 of the Rules, the Qualification test for 9 % N i steel is to comply with the followings:
(1) Qualification
(a) Welders are to have the qualification given in Table 2.2.12, 2.2.13 and 2.2.14 of the
![]()
40 Guidance Relating to the Rules for the Classification of Steel Ships 2015
![]()
(b)
Rules according to the actual welding procedure, and the thickness of welding materials and welding position. However, the requirements equivalent to mild steel apply to welder having the qualification for all positions.
Any applications who intends to be qualified for each Grade and each Kind of 9 % N i steel are to have performance qualification of the corresponding Kind and Grade of mild steel.
(c)
The kinds of welding procedure are "SMAW") and semi-automatic welding.
shield metal arc welding (hereinafter referred to The welders are to be pass the performance qual-
(d)
ification test required according to the each applicable procedure.
Notwithstanding the requirements given in (c), welder having the qualification for SMAW
who intended to be qualified for semi-automatic welding may make the performance qual- ification test for semi-automatic welding of the corresponding and lower qualification with the his SMAW qualification by the Society's approval.
(2) Kinds and procedures
The welding procedure, welding position and test procedure for welders are to be in accordance with Table 2.2.12 and Table 2.2.13 of the Rules, respectively. In the test procedure for plates, longitudinal face bend test may be substituted for face bend test and root bend test, and longi-
tudinal face bend test for side bend test. In the test procedure for pipes, radiographic inspection may be substituted for bend test.
(3) Test assemblies and welding consumables
(a) The test assemblies for plates are to be of RL 9N53 or RL 9N60 specified in Ch 1 of the
Rules or those considered equivalent by the society.
(b)
(c)
The test assemblies for pipes are to be of RLP 9 specified in Ch 1 of the Rules or those considered equivalent by the Society.
Welding consumables used in the test are to be those for 9 % N i steel recognized by the
Society.
(4) Test assemblies for plates
The shape and size of the test assemblies of plates are to be in accordance with Fig 2.2.8-1
of the Guidance.

Fig 2.2.8-1 Dimensions and Types of Plate Test Assembly of the Qualification Test for 9% Ni Steel (Units : mm)
![]()
Guidance Relating to the Rules for the Classification of Steel Ships 2015 41
![]()
(5) Test assemblies for pipes
The shape and size of the test assemblies for pipe welding are to comply with Fig 2.2.8-2 of the Guidance.

Fig 2.2.8-2 Dimensions and Types of Pipe Test Assembly of the Qualification Test for 9% Ni Steel (Units : mm)
(6) Longitudinal bend test
The shape and size of the longitudinal bend test specimen are to be of R B 1 in Table 2.2.2 of the Rules. The test specimen is to be face bent jig shown in Fig 2.2.1 or 2.2.2 of the Rules, and no cracks of 3 mm or more in length in any direction or no remarkable defect are to exist on the bent outer surface.
(7) Radiographic test
Radiographic test is to be carried out on all welding lines of the pipe test assemblies where no significant defects are to exist.
5. Application of equivalent standards
In application to 501. 5 of the Rules, it may be considered as equivalent for that the requirements of the standard internationally recognized(AWS, ASME etc) or considered as equivalent for those by the Society instead of the requirements for welder performance qualification of this section are applied.
503.
Testing procedure
1. Test assembly
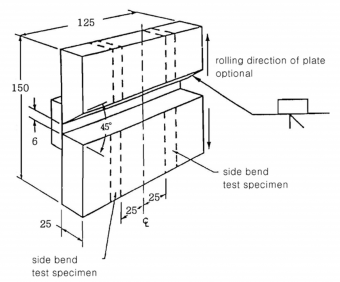
In application to 503. 2 (3) of the Rules, the test position, dimensions of test assembly and edge preparation for welding in 2G position are to comply with Fig 2.2.9 of the Guidance.
![]()
42 Guidance Relating to the Rules for the Classification of Steel Ships 2015
![]()

Fig 2.2.9 Dimensions of test assembly and edge preparation in 2G position
2. Examination and test
(1) "at the discretion of the Society" referred in Note (3), Table 2.2.15 of 503. 3 of the Rules means where the soundness for test specimens and welder qualification are difficult to be veri- fied by test of Table 2.2.15 of the Rules.
(2) In application to 503. 3 (3) (d) of the Rules, defects appearing at the corners of a test speci-
men during test can be investigated in accordance with Pt 1, Ch 1, 104. or 105. of the Guidance.
(3) Radiographic testing
In application to 503. 3 (4) of the Rules, the radiographic testing procedures and acceptance criteria are to be in accordance with the followings :
(a) Where deemed the excess of the amount of heat input by visual inspection after welding, bend tests other than radiographic testing may be required additionally.
(b) The acceptance criteria for radiographic examination is to comply with the requirements specified in 3 (3) of Annex 2-7.
3. General requirements for qualification validity
(1) In application to 503. 6 (3) of the Rules, the suspension of welder qualification is to be in ac- cordance with the followings.
(A) When welder quits his job from the company where he had employed and certified.
(B) Where there is some specific reason to question a qualified welder's ability.
(2) The effectiveness of qualification of welder who has switched his job may be considered as re- maining, provided that the followings are satisfied
(A) It is to be proved that the welders have kept performance qualification at previous company.
(B) It is to be proved that welding condition is similar to those of previous company, and the welders carried out qualified work with acceptance welding performance.
(C) When welders have not used a particular process and equipment for a period excessing six months.
![]()
Guidance Relating to the Rules for the Classification of Steel Ships 2015 43
![]()